

December 3, 2025
Quick start: setting up your first survey
1. Sign in to Your Account
- Go to your app login page: https://www.checkbox.com/sign-in/
- Enter your Checkbox Account Name, which you chose when creating your account. If you aren’t sure of your account name, email us at support@checkbox.com.
- Enter your username and password. Use the Forgot Password link if you need help.

TIP: If you don’t want to enter your Account Name each time, simply add /login/[your_account_name] to the end of the login URL and bookmark that URL. For example, if your account was hosted in the US and your account name was “widgetco”, you would bookmark https://app.checkbox.com/login/widgetco.
2. Create Your First Survey
I. Create a blank survey
- From the main Surveys area, click the Create Survey button.

II. Fill out your survey’s info
- Name your survey
- Enter what you’d like to appear at the end of your custom survey URL. In this example, our custom link would be https://mycompany.checkboxonline.com/newsurvey.
- Select an existing folder to save your survey in (optional).
- If you’d like to create your survey from an existing Template, choose the Template name from the dropdown. Otherwise, you will be creating a new, blank survey.

III. Add a survey question to Page 1
- Your new survey has been created with a single blank survey page and a Completion page, which is where your thank you message will go.
- Under Page 1, click the Add Survey Question button
- Choose the Question Type you’d like to add. If you aren’t sure, you can find some descriptions and examples here.

IV. Customize your question
- Enter your question text and optional subtext.
- Enter your answer choices, hitting enter or clicking the Add Choice button to add more options.
- Enable options under Behavior to make your question required, randomize your answer choices, or allow respondents to enter their own “other” option.
- Change your question layout under Appearance.

V. Add survey logic (optional)
- Add Conditions to your question if you’d like to only show them based on how someone answers a previous question, or based on something about the respondent or the survey response.
- Add Conditions or Branching to your page if you want to hide the whole page based on conditions or skip a respondent over certain pages.
- For more information on survey logic, see our Conditions and Branching Guide.

VI. Add additional survey pages (optional)
- Add additional pages using the Add New Page button.
- To change the order of pages you can drag and drop them into place using the Move icon.

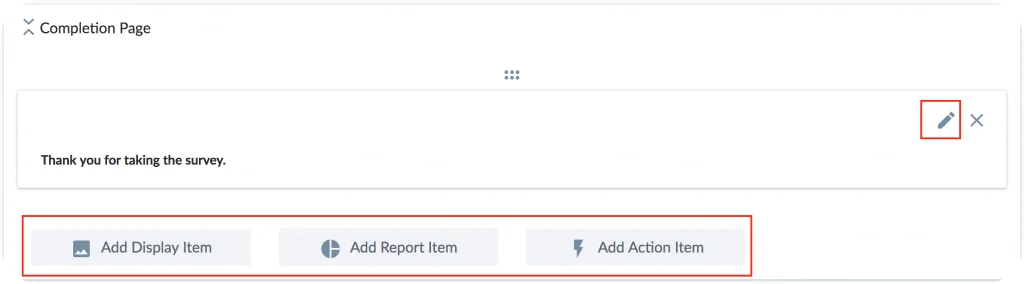
VII. Customize your Completion Page (optional)
- Your Completion Page comes with a basic thank you message, “Thank you for taking the survey.” Click the edit icon to change the message.
- You can add multiple messages and add logic rules to each so respondents see custom messages based on their survey answer(s) or Contact profile(s).
- You can also add action items such as automatic emails or redirects to other URLs under Add Action Item.
3. Survey Appearance and Settings
Checkbox includes a number of different survey configuration options in the Settings area. Some you may use often, others infrequently or not at all.
We encourage you to test out the different settings but contact support if you have any questions about them prior to sending out your survey.

I. Survey Style & Appearance
- Click Settings -> Style to apply or change your survey’s style template. This will change the color scheme, background images, and default fonts.
- You can create your own custom Style templates, which can include your own logo/branding, in the main Styles ares. For more information, see our Branding Guide.
- Click Settings -> Appearance to adjust other settings such as adding page numbers, questions numbers, a progress bar, and more. Feel free to test out these settings until your survey looks just right.

II. Other Survey Settings
- Use Respondent Settings to set the Privacy Level of your survey and other respondent-level permissions.
- Use Response Limits to set a start or end date of your survey, or response quotas.
- Use Language/Translation to set your survey up in multiple languages (not available on Standard plans)
- Use Customize Text to customize the validation/error message and button text on your survey.
- Use Admin Permissions to share your survey with other admin users on your account.
- Use Advanced to add survey-wide JavaScript or CSS to your survey (not available on Standard plans).
4. Share/distribute your Survey
Checkbox allows you to share your survey via any of the following methods – you can feel free to choose one or more:
- via Checkbox email campaigns (includes scheduling, tracking and reminders)
- via Checkbox SMS/text campaigns (includes scheduling, tracking and reminders)
- as a public link (that you can paste into your own email, onto your website, etc.)
- embedded in a website or pop-up
- via social media plugins
- as a QR code (add to printed materials for easy scanning)
I. Activate your survey
- Before you share/distribute your survey, make sure you activate it using the dropdown option to the right of your survey title.
- If your survey is in Draft or Archive mode, your respondents will not be able to access the survey.

II. Share via Checkbox Email Campaigns
- Checkbox Email Campaigns allow you to schedule survey email invitations, track respondents, and schedule/send follow up reminders automatically.
- Under Share, click the Create Email button and follow the prompts on the Message, Recipients, and Schedule tabs to set up and send your email campaign through Checkbox. See our Email Campaign Guide for more details.
- **Note that when sending your survey via Checkbox email campaigns, it’s generally recommended to set your survey Privacy Level to Email Campaign Only under Settings -> Respondent Settings.

III. Share via Checkbox SMS Campaigns
- Checkbox SMS Campaigns allow you to schedule survey SMS/text invitations, track respondents, and schedule/send follow up reminders automatically.
- Under Share, click the Create SMS button and follow the prompts on the Message, Recipients, and Schedule tabs to set up and send your SMS campaign through Checkbox. See our SMS Campaign Guide for more details.

IV. Share via link
- Under Share, select "Online/va Link". Copy either the Default URL or Custom URL (these are interchangeable).
- Paste to share on your website, on social media sites, using your own email, etc.
- **Note that in order for everyone to be able to access your survey link, you will want to set your survey Privacy to Public under Settings -> Respondent Settings.

V. Share by embedding on your website
- Under Share, select "Online/via Link and copy the Embed iframe code.
- Paste the iframe code into the raw HTML of any page on your website or intranet site, or in a website pop-up
- **Note that in order for everyone to be able to access your survey link, you will want to set your survey Privacy to Public under Settings -> Respondent Settings.

VI. Share via Social Media
- Under Share, choose the Social Media site you’d like to share your survey on.
- **Note that in order for everyone to be able to access your survey link, you will want to set your survey Privacy to Public under Settings -> Respondent Settings.

VII. Share via QR Code
- Under Share, click the download icon next to the QR code. Add the QR code image file to your printed materials (e.g. postcard, receipt, etc.) – survey respondents will be able to use any QR code reader to scan your QR code and access your survey.
- **Note that in order for everyone to be able to access your survey link, you will want to set your survey Privacy to Public under Settings -> Respondent Settings.

5. View/Export Responses and Run Reports
I. View or Export Responses (your raw survey data)
- Go to the Responses tab of your survey to view and edit individual responses. Use the filter icon to filter out test/incomplete responses or add a date filter.
- Click the Export icon to export your response data.
- The Export Responses option will allow you to choose to export to .csv or .sav, and choose what information to export.


II. View your Standard Report
- From within your survey editor, click the Report tab to view your auto-generated Standard Report. This report is created automatically based on default settings in your account (a System Admin on your account can change the defaults under Account Settings -> Reports.)
- Click the Edit tab to add additional charts, change chart types, hide charts, or add filters. Note that auto-generated charts cannot be deleted, only hidden from view using the “eye” icon.
- You can add branding to your report by choosing a style template on the Style tab.
- To share your report, click the printer icon for printing and exporting options or click the Share tab to share a report link for live results.
- For more details, see our Reports Overview.

III. Create & Run Custom Dashboards
- To create a more custom report or a report based on multiple surveys, you will want to use the Dashboards feature.
- Go to the main Dashboards menu to create a new custom report.
- Click Create Dashboard
- Click Add Dashboard Chart
- Choose your dashboard item options 1) Name (optional), 2) Survey and Question Source, 3) Chart Type, 4) Report Filter (optional), and 5) Size
- Click Add
- Once you are done adding your charts, click the View tab to view your results
- For more details, see our Dashboards Guide


